PoE How to Use Foulborn Orbs Effectively

PoE How to Use Foulborn Orbs Effectively

In Path of Exile 3.27, the Foulborn Orbs of Augmentation and Regal have redefined how players approach item crafting. These orbs allow access to corrupted modifiers, enabling deeper customization for gear. However, to use them effectively, players must understand timing, item bases, and mod synergy.

Start by identifying your goal — whether crafting offense, defense, or utility gear. Foulborn Augmentation adds one random corrupted modifier to a magic item, so pre-setting one desirable prefix or suffix helps narrow down the outcome. Always begin with a clean, high-quality base to increase your chances of success.

Once the base is ready, roll until you find one powerful mod. Then, use the Foulborn Augmentation to add another. If the combination works, proceed with the Foulborn Regal to elevate the item into a rare form. This step often decides whether your gear becomes valuable or ends up in the vendor.

Efficiency depends on minimizing randomness. Study the Foulborn PoE Currency modifier pool beforehand — some mods, like corrupted resistances or hybrid damage boosts, have a higher impact for certain builds. Knowing which ones to aim for will save a large amount of currency.

In crafting sessions, patience is your strongest tool. It’s tempting to spam orbs, but disciplined rolling brings better long-term results. Players who craft methodically often discover consistent mod patterns that help predict outcomes.

Farming these orbs efficiently also boosts crafting speed. Focus on maps featuring corrupted enemies or strongholds. Investing in atlas nodes that improve Foulborn encounter rates provides a steady supply of crafting materials without PoE 1 Currency relying on trade.

Advanced crafters can combine Foulborn orbs with bench meta-mods to lock prefixes or suffixes. This tactic limits risk, ensuring new corrupted mods fill specific gaps in your build. Although more costly, it’s the best method for crafting high-end items.

Ultimately, using Foulborn orbs effectively is about planning and patience. Whether you’re upgrading your gear or crafting for trade, understanding the mechanics behind corruption ensures every orb spent brings real progress.

Black Ops 7 Early Team Rankings: Breaking Down the Competitive Landscape

Black Ops 7 Early Team Rankings: Breaking Down the Competitive Landscape

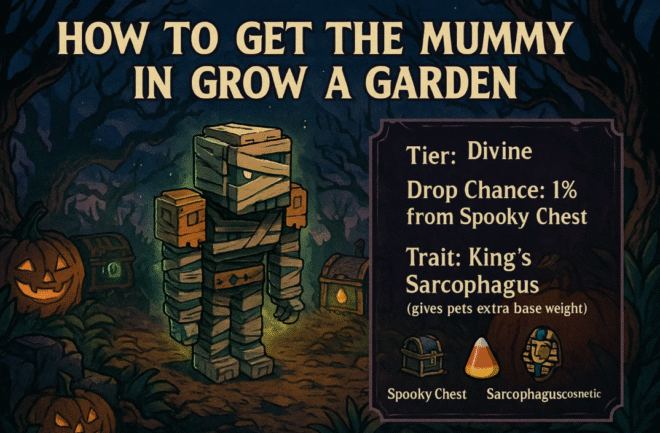
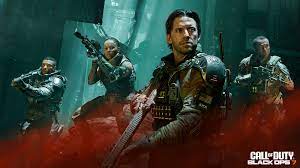
With Black Ops 7 just around the corner, the Call of Duty League community is already buzzing with roster discussions and power rankings. Now that most teams have confirmed or rumored lineups, it’s time to take a closer look at where each squad stands heading into the next competitive season. Based on the latest roster updates, scrim rumors, and overall player potential, here’s a breakdown of what to expect from the upcoming BO7 season — and how these changes might affect both the pros and players grinding in black ops 7 bot lobbies.


Optic: Still the Benchmark

No surprises here — Optic remains the clear S-tier favorite heading into Black Ops 7. Coming off back-to-back championships at both Champs and EWC, this roster has proven its dominance. Their chemistry, coordination, and individual mechanics remain unmatched. Unless they face major internal issues, Optic is poised to set the pace for the entire CDL once again.

For casual players and competitors alike, Optic’s strategies often serve as a blueprint for improving gameplay in BO7 bot lobbies. Watching how they rotate, hold angles, and manage tempo offers valuable lessons for anyone looking to climb faster in ranked or practice modes.


LA Thieves: The Closest Contenders

The LA Thieves are shaping up to be Optic’s biggest rivals. With Kenny and Azy joining Scrappy and Hydra, this squad brings a mix of proven chemistry and raw slaying power. Their ceiling is clearly S-tier, and while consistency has occasionally been their downfall in the past, the new lineup feels like a step in the right direction.

Many competitive players are already testing LAT-style setups in black ops 7 bot lobbies to emulate their aggressive map control and fast-paced mid-round adjustments. If LAT can maintain focus across long series, they could challenge Optic for the top spot.


Vegas FaZe: Underrated but Dangerous

The rebranded Vegas FaZe might be the most polarizing roster of the offseason. Critics doubt their synergy, but this lineup has huge upside. Players like Draza and Abuza bring raw talent and championship experience, while O4 and S anchor the team with consistent firepower.

Despite inconsistent performances in BO6, FaZe’s mix of personalities and playstyles could thrive under the new Black Ops 7 meta. Expect them to fluctuate between A and B tier throughout the year — capable of stunning top teams one week and struggling the next.

For those grinding U4N or farming XP in BO7 bot lobbies, Vegas FaZe’s balanced team composition is a great model for building flexible, multi-role loadouts that adapt to any matchup.


Toronto Koi: A Potential Dark Horse

Toronto Koi’s new roster featuring Joe Deceives, Real, Kleenex, and Insight looks like a solid B-tier lineup — but with potential to climb higher. The addition of Real from the Miami Heretics gives them explosive slaying power, while Insight’s composure and leadership anchor the backline.

The main challenge will be consistency. This team could easily upset a top roster one match, then underperform the next. Still, their mechanical talent and teamwork make them a serious threat in early tournaments.


The Middle of the Pack: Gentle Mates, Falcons, and Boston Breach

Several mid-tier teams are entering Black Ops 7 with uncertain trajectories. Gentle Mates (Ghosty, Envoy, Neptune, and Cib) could peak as high as S-tier but suffer from occasional inconsistency. The Falcons’ roster, featuring Selium and Kismmet, has strong individual players but may lack cohesion in early events. Meanwhile, Boston Breach looks improved with Nasty replacing Awakening — though their “hot and cold” nature remains a concern.

These squads will likely trade wins in qualifiers but struggle to maintain top-three form. For everyday players experimenting in black ops 7 bot lobbies, these teams’ flexible approaches are worth studying — particularly how they adapt strategies mid-match and test different compositions.


The Lower Tier: Carolina Ravens, G2 Minnesota, and Cloud9 New York

Unfortunately, the lower-tier teams have a tougher road ahead. The Carolina Ravens’ mix of rookies (Craze and Lurks) with veteran Slasher might not be enough to push them past the D tier. G2 Minnesota’s lineup feels disjointed, with several players lacking clear roles, while Cloud9 New York’s roster — though mechanically capable — doesn’t appear to have the slaying consistency needed for long-term success.

Still, the early season could bring surprises. We’ve seen rookie duos explode out of nowhere before. For fans, these teams are worth keeping an eye on during the first split of Black Ops 7.


With so many new combinations and returning stars, Black Ops 7 is shaping up to deliver one of the most competitive CDL seasons in years. Optic remains the team to beat, while LA Thieves and Vegas FaZe could make serious noise depending on how quickly they mesh. Meanwhile, dark horse teams like Toronto Koi might shake up the standings when the meta stabilizes.

For players looking to sharpen their mechanics or experiment with loadouts in BO7 bot lobbies, now’s the perfect time to prepare for the new season. As always, platforms like U4N will see renewed activity as players test strategies, grind XP, and get ready for ranked competition.

How to Get the Mummy in Grow a Garden

buy gag pets

The Mummy is a Divine Pet introduced in the third expansion of the Halloween Event in Grow a Garden. This unique creature not only has a striking design but also grants a powerful bonus to your other pets through its special ability.

Appearance

The Mummy resembles an ancient Egyptian mummy, featuring a mix of green and white wrappings that give it a haunting yet regal look. It fits perfectly within the spooky Halloween theme of the event.

While obtaining the Mummy might take patience and a bit of luck, it’s absolutely worth the effort for players who want to strengthen their gardens. Its King’s Sarcophagus ability offers a lasting advantage, making every new pet you hatch even more powerful. And if you’re looking to expand your collection further, don’t forget to buy gag pets and other special creatures from the seasonal shops — they can add both fun and unique bonuses to your growing garden!

Trait

King’s Sarcophagus – This trait allows pets obtained from chests to gain an additional 0.1–0.28–0.5 KG to their base weight, up to a maximum of 3.5 KG.

Note: The ability only activates if the Sarcophagus cosmetic is placed in the player’s garden.

Mummy Overview

CategoryDetails
TierDivine
Obtaining MethodSpooky Chest – 1% chance
Exotic Spooky Chest – 1% chance
Special Exotic Spooky Chest – TBA%
PassiveKing’s Sarcophagus: As long as players have a Sarcophagus in their Garden, pets obtained from chests have a chance to receive extra base weight.
Hunger88,000
Obtainable?Yes
Date AddedOctober 25th, 2025

How to Get the Mummy

To obtain the Mummy, players need to acquire a Spooky Chest, which is sold by the Spooky Seeds Shop in the Spooky Market.
However, the drop rate is extremely low — only 1% per chest — meaning it may take multiple attempts before successfully hatching a Mummy.

While Spooky Chests themselves aren’t too expensive, the rarity of the Mummy means players should prepare to farm several chests for a realistic chance at obtaining it.

Earning Candy Corn

Candy Corn is the event currency required to buy Spooky Chests. Players can earn it by participating in various Halloween activities, such as:

  • Filling up the Witch’s Cauldron
  • Completing quests for the Dead Tree
  • Donating specific crops to the Harvest Reaper

Why the Mummy Is Worth It

The Mummy is one of the most valuable Divine Pets for players who want to enhance their pet collection’s overall strength. When combined with the Sarcophagus cosmetic, it passively improves all future pets obtained from chests by increasing their base weight — making them stronger right from the start.

Pokémon Legends: Z-A Shiny Egg Breeding Tips

Shiny Pokémon are one of the most coveted prizes in the Pokémon universe, and for good reason—they’re rare, visually stunning, and they offer a sense of accomplishment to those who manage to catch them. In Pokémon Legends: Z-A, shiny Pokémon can be obtained in several ways, with breeding being one of the most effective. This guide will walk you through the best strategies for breeding shiny eggs, and help you increase your chances of hatching that shiny Pokémon you’ve been dreaming of.

Getting Started with Shiny Egg Breeding

Breeding shiny Pokémon in Pokémon Legends: Z-A follows similar principles to other games in the series, but there are specific mechanics to understand. First, you’ll need a male and a female Pokémon of the same species, or compatible species, placed in the Day Care or Nursery. To boost your chances of hatching a shiny Pokémon, you must focus on increasing the odds through methods like the Masuda Method or using a Shiny Charm.

When it comes to Pokémon Legends: Z-A, the key to success lies in preparation. Be sure to stock up on the right items, such as the Shiny Charm, which significantly boosts your chances of encountering a shiny Pokémon. If you’re feeling impatient or want to increase your chances of success more quickly, you can always consider purchasing shiny Pokémon from reputable sources. If you’re looking to buy shiny Pokémon, you’ll find reliable sellers who can offer you high-quality, rare Pokémon for your collection. This can be a helpful shortcut if you’re aiming for specific shiny Pokémon or simply don’t have the time to breed them yourself.

Using the Masuda Method for Increased Shiny Odds

The Masuda Method is one of the most well-known strategies for breeding shiny Pokémon, and it works by breeding Pokémon from different regions. When you breed two Pokémon from different language games, the chances of hatching a shiny egg are significantly increased. This method is incredibly effective for anyone looking to add shiny Pokémon to their collection without relying purely on luck.

In Pokémon Legends: Z-A, you’ll want to use the Masuda Method with Pokémon from different regions or even languages. The more diverse your breeding partners, the higher your chances of success. Pairing Pokémon with different regional origins is a key factor in maximizing your odds. However, this can require a bit of patience, as obtaining foreign-language Pokémon might take some effort.

The Role of the Shiny Charm in Breeding

The Shiny Charm is another powerful tool that increases your odds of breeding a shiny Pokémon in Pokémon Legends: Z-A. The Charm is awarded after completing the Pokédex, and once obtained, it significantly enhances your chances of encountering shiny Pokémon while breeding. When combined with the Masuda Method, the Shiny Charm boosts your odds even further, making it an essential item for anyone serious about breeding shiny Pokémon.

Once you have both the Shiny Charm and the right breeding partners, your chances of getting that shiny egg will increase drastically. Keep in mind that it still requires patience and multiple attempts to succeed, but the results are absolutely worth it.

Shop for Pokémon ZA and Enhance Your Collection

While breeding is one of the most fulfilling ways to obtain shiny Pokémon, sometimes you just want to skip the wait and get your hands on rare, ready-to-hatch eggs. This is where the option to shop for Pokémon ZA comes in handy. There are many online stores where you can find shiny Pokémon for sale, offering you the opportunity to purchase exactly what you need for your collection. Whether you’re looking for a specific shiny or just want to add some rare specimens to your team, shopping for shiny Pokémon can be a time-saving alternative to the traditional breeding method.

Breeding shiny Pokémon in Pokémon Legends: Z-A is an exciting and rewarding process, but it requires dedication and the right tools. By using methods like the Masuda Method and acquiring the Shiny Charm, you can significantly increase your chances of hatching shiny eggs. Additionally, if you want to skip the grind or just add rare Pokémon to your team, don’t hesitate to buy shiny Pokémon or shop for Pokémon ZA to enhance your collection. With these tips, you’ll be well on your way to having the most coveted shiny Pokémon in your roster. Happy breeding!

FIFA 26: Competitive Multiplayer and Arcade Action

FIFA 26: Competitive Multiplayer and Arcade Action

FIFA 26 isn’t just another soccer game – it delivers a fast-paced, adrenaline-fueled experience that keeps players fully engaged. With smooth controls and high-speed gameplay, it’s ideal for competitive gamers who thrive on intensity and quick decision-making.

One of FIFA 26’s highlights is its refined gameplay mechanics. From realistic ball physics to fluid player movements, every detail has been carefully optimized to make each match feel fresh and challenging. This level of precision ensures players stay hooked and enjoy every game to the fullest.

Beyond gameplay, FIFA 26 features stunning visuals that bring every match to life. From the vibrant green of the pitch to detailed player models, the graphics create an immersive experience on both the latest consoles and high-end PCs. Additionally, acquiring FC 26 Coins can help you enhance your squad and gain a competitive edge, adding another layer of strategy to your gameplay.

For players who thrive on competition, FIFA 26 features a comprehensive online multiplayer mode that challenges your skills at every turn. Whether taking on friends or competing with gamers worldwide, FIFA 26 offers endless opportunities for competitive matches. With customizable tournaments, leaderboards, and smart matchmaking, it provides everything you need to elevate your game.

FIFA 26 combines fast-paced arcade action with refined gameplay mechanics, realistic graphics, and enhanced online features. To further strengthen your squad and gain an edge, you can also use FUT 26 coins, adding an extra layer of strategy to your competitive experience.

The Ultimate Guide to Mastering Wall Jumps and Omnimovement in Call of Duty: Black Ops 7

cod bo7 bot lobbies

Call of Duty: Black Ops 7 (BO7) has redefined mobility in the franchise, taking advanced movement mechanics to a new level. From wall jumps to omnimovement, the skill ceiling for players has never been higher. If you’ve ever been outmaneuvered by someone bouncing off walls like a cybernetic ninja, this guide is for you.

Below, we’ll break down how to master wall jumps and omnimovement in CoD BO7, offer training tips, and even discuss how buying BO7 bot lobbies can help you improve faster and dominate multiplayer matches.

To take your training even further and put your new movement skills to the test, consider exploring customized match environments. When you buy CoD BO7 lobby access, you can join private or semi-private sessions tailored to your skill level — perfect for practicing advanced movement, experimenting with weapon loadouts, and refining strategies without the chaos of public matchmaking. It’s one of the most effective ways to apply what you’ve learned from this guide and elevate your gameplay to a professional level.

Understanding Omnimovement in BO7

BO7’s omnimovement system expands on the fluid mechanics from earlier titles like Black Ops 3 and Advanced Warfare. It allows players to move freely in 360 degrees, chaining together slides, wall runs, and jumps in any direction without breaking flow.

Key Components of Omnimovement

  1. Multi-Directional Boosting – You can now boost in nearly any direction, even midair.
  2. Wall Interaction – Surfaces can be used to reset momentum, opening up complex movement routes.
  3. Seamless Transitions – Sliding, jumping, and climbing can now blend smoothly without animation delays.

Pro Tip: Spend time in private matches experimenting with different surface types and angles. Learn how your boost meter regenerates depending on the movement sequence.

Mastering the Wall Jump

The wall jump is a cornerstone of advanced mobility in BO7. It lets you bounce off vertical surfaces to gain new vantage points, escape fights, or chain into advanced combos like wall jump → slide → boost.

How to Perform a Wall Jump

  1. Sprint toward a wall at an angle.
  2. Jump and press your boost key (or double jump button) as soon as you make contact.
  3. Angle your camera away from the wall to push off in the desired direction.
  4. Chain the move by adding a slide or a second wall jump onto nearby surfaces.

Advanced Tips

  • Momentum Management: Hitting the wall at a shallow angle helps retain forward speed.
  • Angle Awareness: Some walls have better “grip zones.” Memorize key spots in each map.
  • Silent Jumps: Tap rather than hold your boost to reduce audio cues.

Combining Wall Jumps with Omnimovement

The real magic happens when you chain wall jumps into omnimovement sequences. Skilled players use this to stay unpredictable in gunfights.

Example Combo:

  1. Slide Cancel → Wall Jump → Midair Boost → Drop-Shot
  2. Wall Jump → Double Boost → Reload Cancel → Slide Strafe

This fluid style of movement not only looks flashy but also gives you a tactical advantage, making you harder to hit while maintaining offensive pressure.

Training Tip: Record your movement routes in custom games. Adjust angles and timings until the sequence feels natural.

Why You Should Practice in BO7 Bot Lobbies

Improving movement mechanics requires repetition — and that’s where bot lobbies come in.

When you buy BO7 bot lobbies, you gain access to private sessions filled with AI opponents that simulate real combat scenarios. This allows you to:

  • Practice wall jumps and slides without pressure.
  • Experiment with weapon loadouts while moving dynamically.
  • Build muscle memory in realistic conditions.

These lobbies are ideal for mastering movement before jumping into ranked or public matches. Many players use them to perfect their omnimovement combos and sharpen their reaction times.

Pro Tip: Adjust the bot difficulty gradually as you improve. Start with Recruit to learn routes, then move up to Veteran for combat realism.

Equipment and Settings for Optimal Movement

To fully unlock BO7’s mobility potential, fine-tune your setup:

  • Controller Settings: Set higher stick sensitivity and lower dead zones.
  • Keyboard/Mouse Players: Use custom binds for jump, slide, and boost to reduce finger overlap.
  • Field of View (FOV): A wider FOV (110–120) improves spatial awareness during complex moves.
  • Audio: Use high-quality headphones to detect boost sounds and wall contact cues.

Final Thoughts

Mastering wall jumps and omnimovement in Call of Duty: Black Ops 7 is more than just a skill — it’s a statement of precision and control. The best players don’t just run and gun; they glide, bounce, and weave through the battlefield like it’s second nature.

Whether you’re grinding ranked play or preparing for tournaments, buy BO7 bot lobbies to sharpen your mechanics and reach your peak performance faster. With consistent practice and the right setup, you’ll soon be the one pulling off insane wall jump kills while your opponents wonder how you did it.

Dance of Knives Rogue Build Guide in Diablo 4 Season 10

The Dance of Knives Rogue build makes a strong return in Diablo 4 Season 10, becoming one of the most effective options for both fast farming and endgame play. It focuses on a fluid, spinning combat style where the Rogue channels Dance of Knives to release constant waves of blades that automatically hit nearby enemies Diablo 4 gold. The attacks deal steady poison and physical damage while the player moves quickly through groups of monsters.

With the updates from Season 10, including new Chaos Perks, Chaos Armor, and Legendary Paragon bonuses, this setup has gained a noticeable power boost, performing well in Helltides, Nightmare Dungeons, and The Pit. The simple mechanics and fast pace make it comfortable to play on controllers and appealing to players who prefer an easy but powerful build.

The build’s strength comes from how Dance of Knives interacts with the Aspect of Bursting Venoms, which triggers Poison Traps on lucky hits. These traps deal explosive poison damage, and the Contamination effect makes them activate instantly, maximizing damage output. The Rogue keeps Poison Imbuement active most of the time, so players can focus on movement and dodging instead of juggling buffs. Skills like Inner Sight provide steady damage boosts with minimal effort, keeping the playstyle smooth and focused on mobility.

The right equipment is essential for getting the most out of the build. Key items include Bands of Ichorous Rose and Scoundrels Leathers, which are central to maintaining poison trap synergy. Depending on the type of content, players can swap between Death Trap and Dash, or use Caltrops instead for better crowd control during boss fights. Off-meta tempering choices like Inner Sight Duration and Shadow Clone Duration can extend the uptime of important buffs, giving more consistent damage during longer fights. Mythic gear such as Heir of Perdition and Starless Skies adds strong bonuses to damage and survivability, rounding out the setup.

The playstyle centers on movement and positioning to keep the spinning blades active at all times. Staying mobile ensures that poison traps hit as many enemies as possible, turning clusters of monsters into poison clouds. Because the skill automatically targets enemies, the player doesn’t need to aim precisely, making it both relaxing and efficient. However, getting stunned or knocked down can interrupt the channeling, so awareness and timing are important in tougher fights. Boss encounters rely heavily on stagger windows for burst damage, rewarding careful use of cooldowns and traps.

While the build is strong, it does come with some challenges. It depends heavily on movement to maintain damage and requires several specific unique items and tempers that can take time to collect. Since most of its power comes from poison-based effects, enemies resistant to poison can slow progress. In extended fights or high Pit levels, it can run into endurance issues if enemies don’t die quickly enough. Crowd control effects can also leave the Rogue exposed, making defensive skills or gear essential for survival.

Players leveling into this setup should focus on reaching level 60 and unlocking the core skills and items before switching to the full version of the build. Once complete, it becomes a versatile choice for nearly all PvE content, excelling at clearing dungeons, farming Helltides, and gathering materials efficiently. Its combination of simplicity, high speed, and strong poison synergy makes it one of the easiest high-performing builds to play this season.

The Dance of Knives Rogue is a fast, agile build that captures the fantasy of a spinning assassin surrounded by poison and blades. Season 10’s Chaos upgrades give it new life, making it both deadly and fun to play diablo 4 unique items. With the right setup and awareness, it delivers excellent results across all major activities in Diablo 4, offering a smooth, high-damage playstyle that suits players who want a mix of efficiency and style.

Mastering the Vex Damage Formula in Borderlands 4

Among all the Vault Hunters introduced in Borderlands 4, Vex stands out as one of the most mathematically intricate and tactically rewarding characters. Her combat system isn’t about raw numbers alone—it’s about understanding the hidden mechanics that Borderlands 4 Cash govern her elemental synergy, cooldown rotation, and precision timing. To truly master Vex, players must learn how her damage formula functions and how to manipulate every component for maximum efficiency.

At the foundation of Vex’s power lies her base weapon multiplier. Every attack starts from a primary coefficient tied to weapon type, elemental charge, and accuracy rate. This coefficient then interacts with two main modifiers—elemental amplification and ability synergy—which determine her actual in-game damage output. In short, the more consistently Vex maintains elemental uptime and skill rotation, the stronger her scaling becomes over time.

Her Arc Core system defines much of her gameplay rhythm. Every time Vex applies an elemental effect, she builds Arc energy that fuels a hidden multiplier within her formula. Once fully charged, her abilities deal drastically increased damage and trigger powerful chain reactions that can wipe out clustered enemies. The key lies in maintaining momentum—allowing her Arc Core to decay resets her bonus, meaning timing and pacing are critical.

Weapon choice directly influences how the formula performs under pressure. Submachine guns and energy rifles work best for stacking elemental statuses quickly, while shotguns serve as short-burst finishers that capitalize on her maximum Arc charge. Precision weapons, like snipers or beam rifles, add another layer of complexity—critical hits apply additional scaling when combined with overlapping elemental effects, often doubling the output of a single shot.

Cooldown management is another pillar of her system. Many players underestimate how important ability cycling is for Vex. The faster she can reactivate skills like Overvoltage or Resonant Burst, the more frequently she can reapply multipliers. Building around cooldown reduction stats and gear ensures a smoother rotation, minimizing downtime between elemental activations and maximizing total DPS.

Understanding elemental matchups is equally essential. The formula automatically factors in resistance and vulnerability modifiers depending on the enemy type. Electric damage devastates shields, corrosive melts through armor, and fire inflicts high damage over time on flesh-based targets. Adapting to each scenario ensures that every hit lands with the optimal damage coefficient—something top-tier players constantly monitor in endgame content.

Environmental awareness plays a surprising role in the formula as well. Vex’s abilities interact dynamically with terrain elements—metallic surfaces amplify shock effects, while explosive barrels can extend the area of elemental spread. Strategic positioning allows her to trigger overlapping status fields, turning confined zones into elemental traps that continuously feed her Arc Core multipliers.

For advanced players, the final step toward Borderlands 4 Items for sale mastering her formula is sequencing and precision. The order in which elements are applied determines resonance strength. For example, shocking an enemy before applying fire increases burn intensity due to reduced resistance—a subtle mechanic built into the internal calculation. Maintaining this pattern through each encounter transforms her from a reactive fighter into a deliberate elemental tactician.

In conclusion, Vex’s damage formula is a perfect blend of science and art—structured enough to be analyzed, yet fluid enough to adapt to any situation. By understanding her elemental system, optimizing gear synergy, and mastering ability rotation, players can turn her into one of the most devastating Vault Hunters in Borderlands 4. Her power isn’t about raw firepower alone—it’s about precision, adaptability, and control over the chaotic energy that defines the Borderlands universe.

Master Mobility: Omnimovement System in Black Ops 7

Master Mobility: Omnimovement System in Black Ops 7

The Omnimovement System is an advanced technology introduced in Call of Duty: Black Ops 7 to take player mobility and combat fluidity to the next level. It enables seamless movement in all directions, giving players precise control over their actions. With this system, you can slide, wall-run, and dodge with remarkable speed and accuracy, making every maneuver feel smooth and dynamic.

Key Features of the Omnimovement System

Enhanced Mobility: The Omnimovement System lets players navigate the battlefield with unmatched fluidity. Whether sprinting across open terrain, sliding into cover, or even practicing moves in a CoD BO7 Bot Lobby, every action feels responsive and natural, allowing you to master the art of movement like never before.

Dynamic Combat: With the Omnimovement System, combat in Call of Duty: Black Ops 7 becomes more intense and thrilling than ever before. You can outmaneuver your opponents, flank them from unexpected angles, and execute lightning-fast attacks with precision and style.

Versatile Actions: From double-jumping to wall-running, the Omnimovement System offers a wide range of versatile actions that give you the upper hand in any situation. You can customize your playstyle and master new tactics to stay ahead of the competition.

The Omnimovement System utilizes advanced motion-capture technology to track and translate your movements in real-time. This allows for seamless integration of different actions and maneuvers, creating a more immersive and responsive gaming experience. Whether you’re navigating tight corridors or engaging in intense firefights, the Omnimovement System will adapt to your playstyle and enhance your overall performance.

With the introduction of the Omnimovement System, Call of Duty: Black Ops 7 is redefining the first-person shooter experience. By blending enhanced mobility and fluid combat with the classic mechanics fans know and love, the game delivers a truly unique and memorable experience.

For anyone looking to push the limits of movement and combat, Black Ops 7 is the perfect choice. The Omnimovement System lets you maneuver and fight like never before, and even CoD BO7 Boosting sessions benefit from these advanced mechanics, helping players maximize their progress and master every aspect of the game.

How to Get Tarantula Hawk in Grow a Garden

buy Grow A Garden pets

The Tarantula Hawk is a Legendary Pet introduced in the Friendship Update of Grow a Garden. Known for its unique abilities and fast pollination skills, it is highly sought after by players.

Overview

  • Hunger: 28,000
  • Tier: Legendary
  • Date Added: June 7th, 2025
  • Exclusive Egg: Anti Bee Egg

The Tarantula Hawk resembles a Wasp but features a blue body and red-yellow wings, modeled after its real-life counterpart, the tarantula hawk.

If you want to experience the fun of collecting rare and legendary companions, now is the perfect time to buy Grow A Garden pets like the Tarantula Hawk. With their unique abilities and vibrant designs, these pets not only help you pollinate fruits faster but also make your garden more lively and exciting. Don’t miss the chance to add these exclusive creatures to your collection!

How to Obtain a Tarantula Hawk

The Tarantula Hawk can only be obtained through the Anti Bee Egg, making it a limited-time, exclusive pet. It has a 13.75% chance of hatching from an Anti Bee Egg.

Methods to Obtain an Anti Bee Egg

MethodCost / RewardNotes
Purchase from Shop149 Robux (1 Egg)
429 Robux (3 Eggs)
1,269 Robux (10 Eggs)
Limited-time shop availability
Quest Rewards5 Anti Bee Eggs per set of 30 Bizzy Bear Recipe QuestsCan be obtained in Recipe 5, Recipe 13, Recipe 22, and Recipe 29

Crafting the Anti Bee Egg

You can also craft it at the Cosmetics Shop using:

  • 1 Bee Egg
  • 25 Honey

Tarantula Hawk Traits and Abilities

The Tarantula Hawk is rarer than the Wasp and has improved traits. Its abilities include:

Trait / AbilityDescriptionCooldown
Wasp PollinatorFlies to a nearby fruit and applies the Pollinated mutationEvery 25 minutes (vs. 30 min for Wasp)
Tarantula StingerStings a random pet and advances its ability cooldownEvery 5 minutes (vs. 10 min for Wasp); reduces cooldown by ~80 seconds (vs. 60)

Additional Notes:

  • Cannot target Chinchilla.
  • Initially, “Tarantula Stinger” could target pets without an active ability, but this was later patched.

Stats Summary

StatValue
Hunger28,000
TierLegendary
Obtaining MethodAnti Bee Egg, Premium Anti Bee Egg (149 Robux)
Hatch Chance30.5%
Obtainable?Yes

Trivia

  • The Tarantula Hawk was added as part of the Bizzier Bees and Friendship Update on June 3, 2025.
  • It is one of 5 pets available in the Anti Bee Egg.
  • Its abilities are faster and more efficient compared to the Wasp, making it a valuable companion for players looking to accelerate pollination and ability cooldowns.

The Tarantula Hawk is a must-have for collectors and players seeking to optimize fruit pollination and pet abilities. Its combination of rarity, speed, and unique abilities makes it a standout Legendary Pet in Grow a Garden.